Been a long time since I was able to blog much. But in the words of Jack Nicholson from The Shining, I’m baaaack!
For the last past few weeks on Twitter I’ve been posting a lot about the #powderkeg trade. I’ve tried to explain what it is, why it works, when its most likely to work. But tweets aren’t always the best way to get a series of points across, and I’ve had a ton of questions about it. It’s not practical or possible to explain it each time someone asks about it, so I thought I’d walk through the finer points here.
First, let me go though what it is NOT (in no particular order):
- The best trade ever. This isn’t a home-run type of trade. If you define it “right” it has small risk and generally good reward. By “good” I mean somewhere between 1 unit of risk for 2-3 units of reward. It’s a solid base hitter, though every now and then it cracks one out of the park.
- One pattern to rule them all. This trade works best on non-trending days or later in the day when any drives from the opening of the session have exhausted their fuel.
That said, it has a lot of good things going for it (again, in no particular order):
- It requires minimal tools, though as you’ll see I use a volume profile. VPs will help tremendously in defining the boundaries and quality of the setup. But truth be told this can be done without a profile.
- It requires minimal preparation.
- It requires no directional bias (it’ll be better if you suspend all bias, in fact). So in some ways, it’s the ultimate anti-revenge-trading tool (I’ll post about revenge trading another time).
- No need to catch a falling knife or catch the top tick.
- Works on pretty much any kind of short duration bar, ones that take 2-5 minutes on average to complete is best. The more bars there are the easier this pattern will be to identify. That said, many Renko bars will work against you here, they are designed to filter out exactly the kind of “chop” we’re after.
- It’s the same pattern every time (but the quality – the ease with which its recognized – and outcome varies, of course).
Why it Works
Markets ultimately have one purpose:
The theory behind this trade is simple. It works because it’s catching the end of a short-time-frame auction cycle… i.e. balance. Once a market achieves balance (supply/demand equilibrium, fair prices, etc.) on any time frame, its purpose has been fulfilled and it must start the cycle over again (see above). More about balance and other profiling concepts here. We want to be ready and waiting when it starts this cycle anew.
What to Look For
- Find an area where price stalls, preferably away from a recent area of balance.
- We want price to have left and returned to this “stall” (balance) area at least once on each side.


Now that we have the basic elements down let’s talk about a few characteristics which sweeten the quality of the setup:
- The more times price exits and reenters the balance area the more powerful the break. At least one excursion-and-return on each side is needed to validate the setup.
- The session VPOC’s included inside the balance area. Even better is when the VPOC’s in another location, you identify a new balance area, and before the balance breaks the VPOC moves into your forming balance area. This means volume’s being expended in this area and (probably) that stop loss orders are accumulating on either side of this balance area. These stops will serve to accelerate the move once it finally breaks the balance area.
Defining the Risk and Reward
There are multiple ways to do this, but ultimately your risk will be just over or under the center of your balance area. Preferably the highest-volume price in your balance area. Ideally it’s the session VPOC (point of control). You’ll want to define your reward at at least 100% of the size of your balance area. If for whatever reason it seems implausible that your target will be achieved, forget the setup and move on.
Example: if your balance area is 10 points across, your ideal 1st target will be 10 points on either side of the boundary of the balance area. Since you’re defining your risk as mas o menos the center of balance, if you enter at a break of the balance area that puts your risk:reward at ~1:2, assuming you only trade one contract or lot. It gets more a little more complex (but with a more favorable ratio) if you trade multiple lots or contracts because you can scale out along the way, booking profits and reducing your risk, while still having ammunition to take down further moves.

Once the reward zones are defined, I like to use a trend line to split the balance area in half. There are many ways to split it in half, but I find this helps keep me focused and in the flow. Use whatever works for you.
I use a bottom or a top trend line depending on which way I think the keg will blow. It really doesn’t matter whether you draw the trend sloping bottom left to bottom right or vice versa as long as it splits the middle of the balance area. If price breaks back through the trend line, no matter which way you draw it, you’ll want to get ready to try in that direction. In this case, based on price action, order flow and internals I think this balance is most likely to break to the upside. So that’s how I draw it.

Getting In
Now that our risk and reward is defined, how to you know when to get in? What you’re looking for is an impulsive directional bar. You HAVE to be paying attention here. This means any bar that starts to move unusually fast in a direction, compared to other bars nearby. Remember, you’re in a balance area, which is generally slow, lazy “chop.” So a bar that starts to hustle should grab your attention. Ideally, you’ll have your entry order(s) ready to go and all you have to do is place it and let price trade through and thereby assure a good fill. If you can’t get filled on your entry it’s probably because you hesitated and chose a bad price. The best prices are always ones that you can actually get filled. The best way to assure a fill is to make sure your order is one that gets traded through while price is on its way somewhere else.
This “trade-through” strategy is my preference, is entry option A pictured below, and will give the best risk and reward. A more conservative entry is to let the impulsive move happen and then wait for a back-test of the balance area to hold. This is option B. You still have to act decisively, or you’ll blow your R:R. Be quick or be dead, as I say. So shoot to kill.

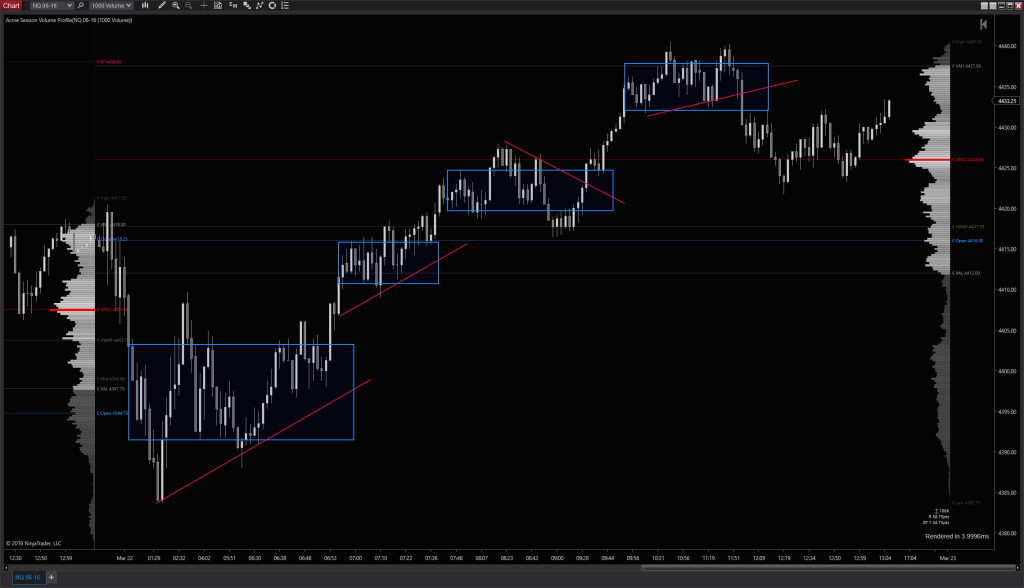
One of two things will happen at this point, and neither are in your control. First, price will move toward your target and you get ready to book your profits, or price comes back at you and enters your stop zone (see above). If it does it’s OK. It happens. Look at the risk here… if you got long at the impulse through 4400 and your sell stop was at 4396, your target was around 4415… that was a 1:4 trade. You can afford to try again or flip the other direction even twice and still profit on the trade. But you have to honor your stop.
OK, so, how’d this one turn out? As you can see below, the impulsive bar I thought would be the magic one was a head fake. But that’s OK, because our stop was never touched again. Price re-entered the balance area, giving it even more power, and a few minutes later it launched out in our direction all the way to and past the previous day’s high. If you have enough units to scale out along the way, the max favorable excursion (MFE) would have been about 25 points, while the max adverse excursion (MAE) was just 9 ticks.

More Examples
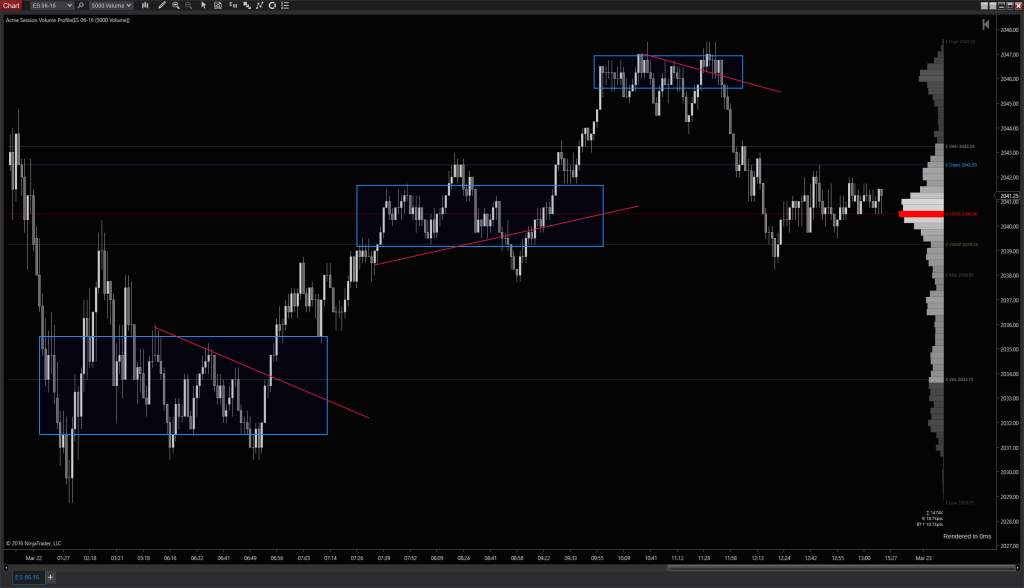
Today gave more than its usual share of #powerkeg opportunities. Generally, there’s one or two a day. But today, thy cup overruneth,… so to speak.


—
Hope this was helpful, amigos. Until next time, trade ’em well…

